In Spring 2018, we released new versions of Xert's Garmin Connect IQ Data Fields via the Garmin Connect IQ Store. These updated fields automatically retrieve your latest Fitness Signature each time you start an activity.
Whether you're updating old versions or installing for the first time, this guide will walk you through installation and troubleshooting.
Updating Existing Xert Data Fields
If you're updating from an older version of our Data Fields, follow these steps:
Step 1: Remove Old Xert Data Fields
-
On your Garmin device, remove all Xert Data Fields from every Activity Profile (e.g., "Train", "Race").
-
Replace them with placeholders (e.g. 'Timer') or rebuild your screens later.
-
Alternatively, remove the fields using Garmin Express on desktop.
Step 2: Restart Your Garmin Device
-
If you're using Garmin Express, safely unplug the device.
-
Turn the device off and back on to ensure the fields are fully removed.
-
Powering off the unit after uninstalling will remove all associated data from the device and ensure a fresh install. This helps clear any residual files from older versions of the Xert Data Fields.
Installing Xert Data Fields
Skip to this section if you're setting up Xert Data Fields for the first time.
Step 3: Reconnect Your Device
-
If using Garmin Express, plug your device back in.
-
If using Garmin ConnectIQ, open the app on your phone and ensure that you're paired to your Garmin device via Bluetooth.
Step 4: Download the Latest Data Fields
Choose your method:
4a) Using Garmin ConnectIQ mobile app:
-
Open the app and select your device.
-
Go to My Data Fields
-
Tap your desired Xert Data Field & select 'Install'
4b) Using Garmin Express (desktop):
-
Connect your Garmin device.
-
Go to Connect IQ > Apps
-
Locate the desired Xert Data Fields and download the latest version.
Step 5: Enter Your Xert Username & Password
Yes, we wish this part were easier too – but Garmin requires you to manually enter your Xert credentials for each individual Data Field to access your Xert Fitness Signature.
The good news? You should only need to do this once during the initial setup.
-
In Garmin ConnectIQ mobile app or Garmin Express, go to:
-
Device > Data Fields > [Xert Field] > Settings
-
Enter your Xert User/Pass
- Click 'Save' to apply the changes.
-
🔐 Tip: Make sure there are no typos. These are case-sensitive.
Step 6: Add Xert Fields to Your Activity Screens
-
On your Garmin device, edit your Activity Profile(s) and add the desired Xert fields back into your data screens.
Step 7: Connect Garmin to Your Phone
-
Ensure Garmin Connect Mobile is running.
-
Wait for your phone to connect to the Garmin device.
Step 8: Start a New Activity
-
Begin recording a new activity on your Garmin.
-
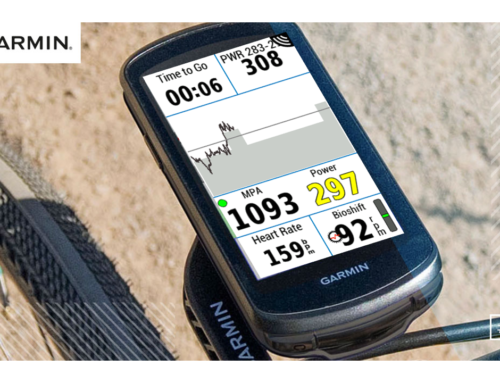
After a few minutes (may take up to 5), you'll see a popup that says "Updated" with your Xert Threshold Power, High Intensity Energy, & Peak Power
- The dot on the left of each Data Field will turn from Orange → Green
💡 Once the dot goes green, your Fitness Signature is saved locally on the device and will be used for the start of the next activity. This is helpful when starting an activity in a place where you don't have access to mobile data.
Troubleshooting
Yellow Dot: Means the field hasn't received an updated Fitness Signature yet.
Try:
- Open Garmin Connect Mobile app on your phone and verify that your phone is paired to your Garmin Device.
-
Start an activity by pressing Start on your Garmin
-
Wait up to 5 minutes—the data field should fetch your signature.
If it turns red, it's likely a login error – see next section.
Red Dot: Indicates a login issue or unread settings.
Try:
-
Double-checking your username/password in the field settings
-
Rebooting your device
-
Switching to a different Activity Profile (one that doesn't use Xert fields), then back again
-
Updating the fields via Garmin Connect or Garmin Express again
If nothing works:
-
Change your Xert account password at XertOnline.com. If you change your password, be sure to edit your password in the settings of each Xert ConnectIQ data field.
Still need help? Visit the Xert Community Forum or send us an email for assistance.