
This is it – the moment you’ve all been waiting for! Group workouts on Xert are finally here! In this how-to article, we’ll walk you through setting up your own indoor group workouts.
Before we get too far, note that you’ll need to be a member of a community to create & participate in group workouts – either a club, team, or a squad. Check out our documentation HERE on the various communities are and how to join or create your own community!
Part 1: Session Details
To get started, head to the sessions homepage and select the option New Session. This will open up the session creation dialogue box, which features 4 main tabs along the top – Session Details, Sharing, Workout, and Media:

- The top header has tabs to the session Details page, Sharing (only enabled for group sessions), Workout, and Media.
- On the Session Details tab, you’ll be able to give your session a name, indicate if the session is solo or with a group, as well as setting the session’s starting date & time. If doing a workout in Xert, you can leave the bottom estimates of Duration, XSS, Distance, Climbing, etc. empty – these will auto-fill once a workout has been selected.
- The session description can be modified by the creator. This would be a good place to indicate any ride details that might be important – bringing adequate hydration/snacks, pre-workout motivation, or notes for your buddies!
Part 2: Sharing
Toggling the Session type from Solo to Group triggers an additional panel to display along the top called ‘Sharing’. Select this tab to indicate which Xert Community you’d like to invite (or schedule, if you’re a coach) to your group workout.

- Begin by selecting the community that you’d like to invite to your session – this can be a club, team, squad, or coaching group
- You can select whether you’d like to invite all members of the community, or select invite only if you wish to keep the session a little more private
- Members of the selected community will be displayed below. If the ‘Invite Only’ option is selected, tap a user once to invite them, and again to un-invite them.
Part 3: Workout
From the workout tab, you’ll finally be able to find and select your group workout!

- The workouts will load with your XATA recommended workouts for the scheduled date/time. In addition to searching for workouts by name, you can also filter by workout focus duration, workout duration, or difficulty level, just as you can from the XATA page.
- When a workout is selected from the list, a miniature workout preview can be seen on the righthand side. Hovering over the workout preview allows you to see the same data as in the workout designer, including interval target power/duration, XSSR, and difficulty score. You’ll also notice options to download the workout in ERG, TCX, or ZWO formats directly beneath the selected workout.
- Finally, the workout steps are displayed below the workout preview. For the best experience, we recommend using fixed duration workouts – try to avoid selecting workouts that use Target MPA as a duration, since the duration of those intervals will vary for different fitness signatures (and will further adjust in real time).
Part 4: Media
Finally, you’ll be offered a variety of different media options for the meetup:

- You can select a YouTube video that can be viewed by all members of the session by heading to the ‘Share’ button of the video you’d like to follow along with and copying the URL provided (e.g. https://youtu.be/YoutubeVideoID ). You can also offset the start time of the video (i.e. a value of 10 indicates the YouTube video will start at the 10 sec mark).
- After a YouTube URL has been pasted, the video thumbnail will display on the right-hand side
- If you’d like to share a certain Spotify playlist with others in the group workout, you can paste the URL to the playlist here. Note that including a playlist does not require members of the group activity to listen to it. Instead, group members can tap the link to open the playlist on their laptop/desktop (or wherever they’re viewing the session). A link to a Zoom meeting can be also placed here if you prefer to set up a group video call during the workout.
- You can also upload images to sessions, if desired.
When you’re done editing the details, click the ‘Save’ icon in the top right-hand corner to save the session (and invite others, if it’s a group session). Note that the session details, date/time, and workouts can all be edited after the session is created.d
Wrapping up!
Once the session is created, it will display on the Sessions page for yourself and anyone else that has been invited to the session. From there, your friends can join the session and launch the session player (when you’re within 2 hours of the start of the session). Note that you can still edit the session date/time, workout , etc. if you’re the owner of the session, or create your own copy of a session to re-use in the future. You’ll also be able to launch Zoom directly or access the Spotify playlist directly from the sessions page:

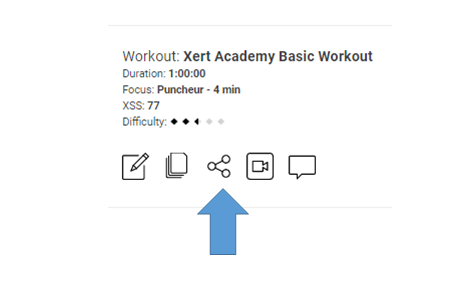
If you prefer to communicate with your riding buddies outside of Xert, you can also share the session directly with your Clubmates, Teammates, or Squadmates via a URL by clicking the ‘Share’ Button (shown on the screenshot on the right):
And there you have it – you now have the knowledge to create your own Group Sessions!
To learn how to Join a group session that you’ve been invited to, see the next support article in the series – Starter Guide: Xert Sessions