The Best of Both Worlds
Indoor training has evolved significantly, and the integration of Xert with Zwift marks a new era for cyclists seeking to enhance their performance. Xert’s advanced training platform adapts to your unique fitness profile, providing personalized workout recommendations that help you maximize your training efficiency. When combined with Zwift’s immersive virtual environment, you can transform your indoor sessions into engaging and effective training experiences. This blog post is a comprehensive guide to help you set up, enjoy, and benefit by combining Xert and Zwift.
For a short video explaining how to set everything up, check out the video below! For more detailed information, continue reading through the rest of the article below!
First Things First – Sensor Setup
A key point that we’d like to address first is the sensor connectivity. Zwift connects to your ANT+ or Bluetooth fitness sensors. So do the Xert Workout Players (Xert EBC for Android & iOS, and Garmin Workout Player). Keep in mind that ANT+ sensors can be paired to multiple apps, while most Bluetooth sensors are limited to a single connection, meaning they can only be paired to one app/program at a time. Some newer devices offer dual Bluetooth connections so they may be able to connect to two apps simultaneously.
- The Xert Remote Player does not connect to your trainer or sensors! It only displays the data being collected from an Xert Workout Player (Android, iOS, or Garmin). The remote player simply allows you to access your workout data from any internet browser.
- Loading Xert workouts by exporting the ZWO files from Xert and importing into Zwift does not require you to use an Xert Workout Player.
- Most importantly, your trainer should only be paired to Xert OR Zwift, not both! If your trainer is paired to both apps/services at the same time, you will get strange behavior from your trainer.
Remember these points and you will save some time trying to figure out why you are not getting power data or getting the correct resistance from your smart trainer. Next up, we will describe the various options that you have when combining Xert and Zwift.
Important Terms To Know
We will use various terms throughout this guide…
- Activity – A session on the bike (or running) that starts and finishes. You will collect data for an activity. Xert manages & analyses data from, and during, your activities.
- Structured Workout – An activity that includes a set of specific power targets of various durations. Structured workouts help athletes manage the workout difficulty, as well as the type and amount of strain applied for performance improvements. In Xert terms, structured workouts have a predetermined Focus & XSS amount.
- Unstructured Workout – An activity that does not include specific power targets but can have goals for the workout. For example, “Ride for 60 minutes at or below to your Lower Threshold Power with several sprints at full power” is an unstructured workout. “Accumulate 100 XSS points with a Focus Duration of 3:00.” is also an unstructured workout.
- Workout – If the word “Structured” or “Unstructured” isn’t used, it is assumed that the workout is structured.
- Power-controlled workout – When using a smart trainer, the power output during intervals in a structured workout are controlled by the smart trainer. It does this by varying the resistance automatically.
- Athlete-controlled workout – The power output during intervals in a structured workout are controlled by the athlete, normally by varying cadence and changing gears but may also involve changing the resistance on a smart trainer using “slope mode” or “resistance mode”. If you don’t have a smart trainer all workouts are athlete-controlled.
Basic Ride Types
There are two basic ride types you will use almost every time:
- Xert Workout exported to Zwift (Easiest)
- Xert EBC controlled SMART workout with Zwift (Recommended for MIXED MODE workouts)
1. Xert Workout Export to Zwift
The new integration between Xert & Zwift allows you to push workouts from Xert to the ‘For You’ section in Zwift, bypassing the need to download & upload ZWO files. While this option is certainly the easiest, note that this option does eliminate the main benefit of using Xert’s EBC mobile apps, which is the dynamic power & duration intervals in many of Xert’s SMART workouts.

Your scheduled workouts from Xert will appear at the top of the ‘For You’ section.
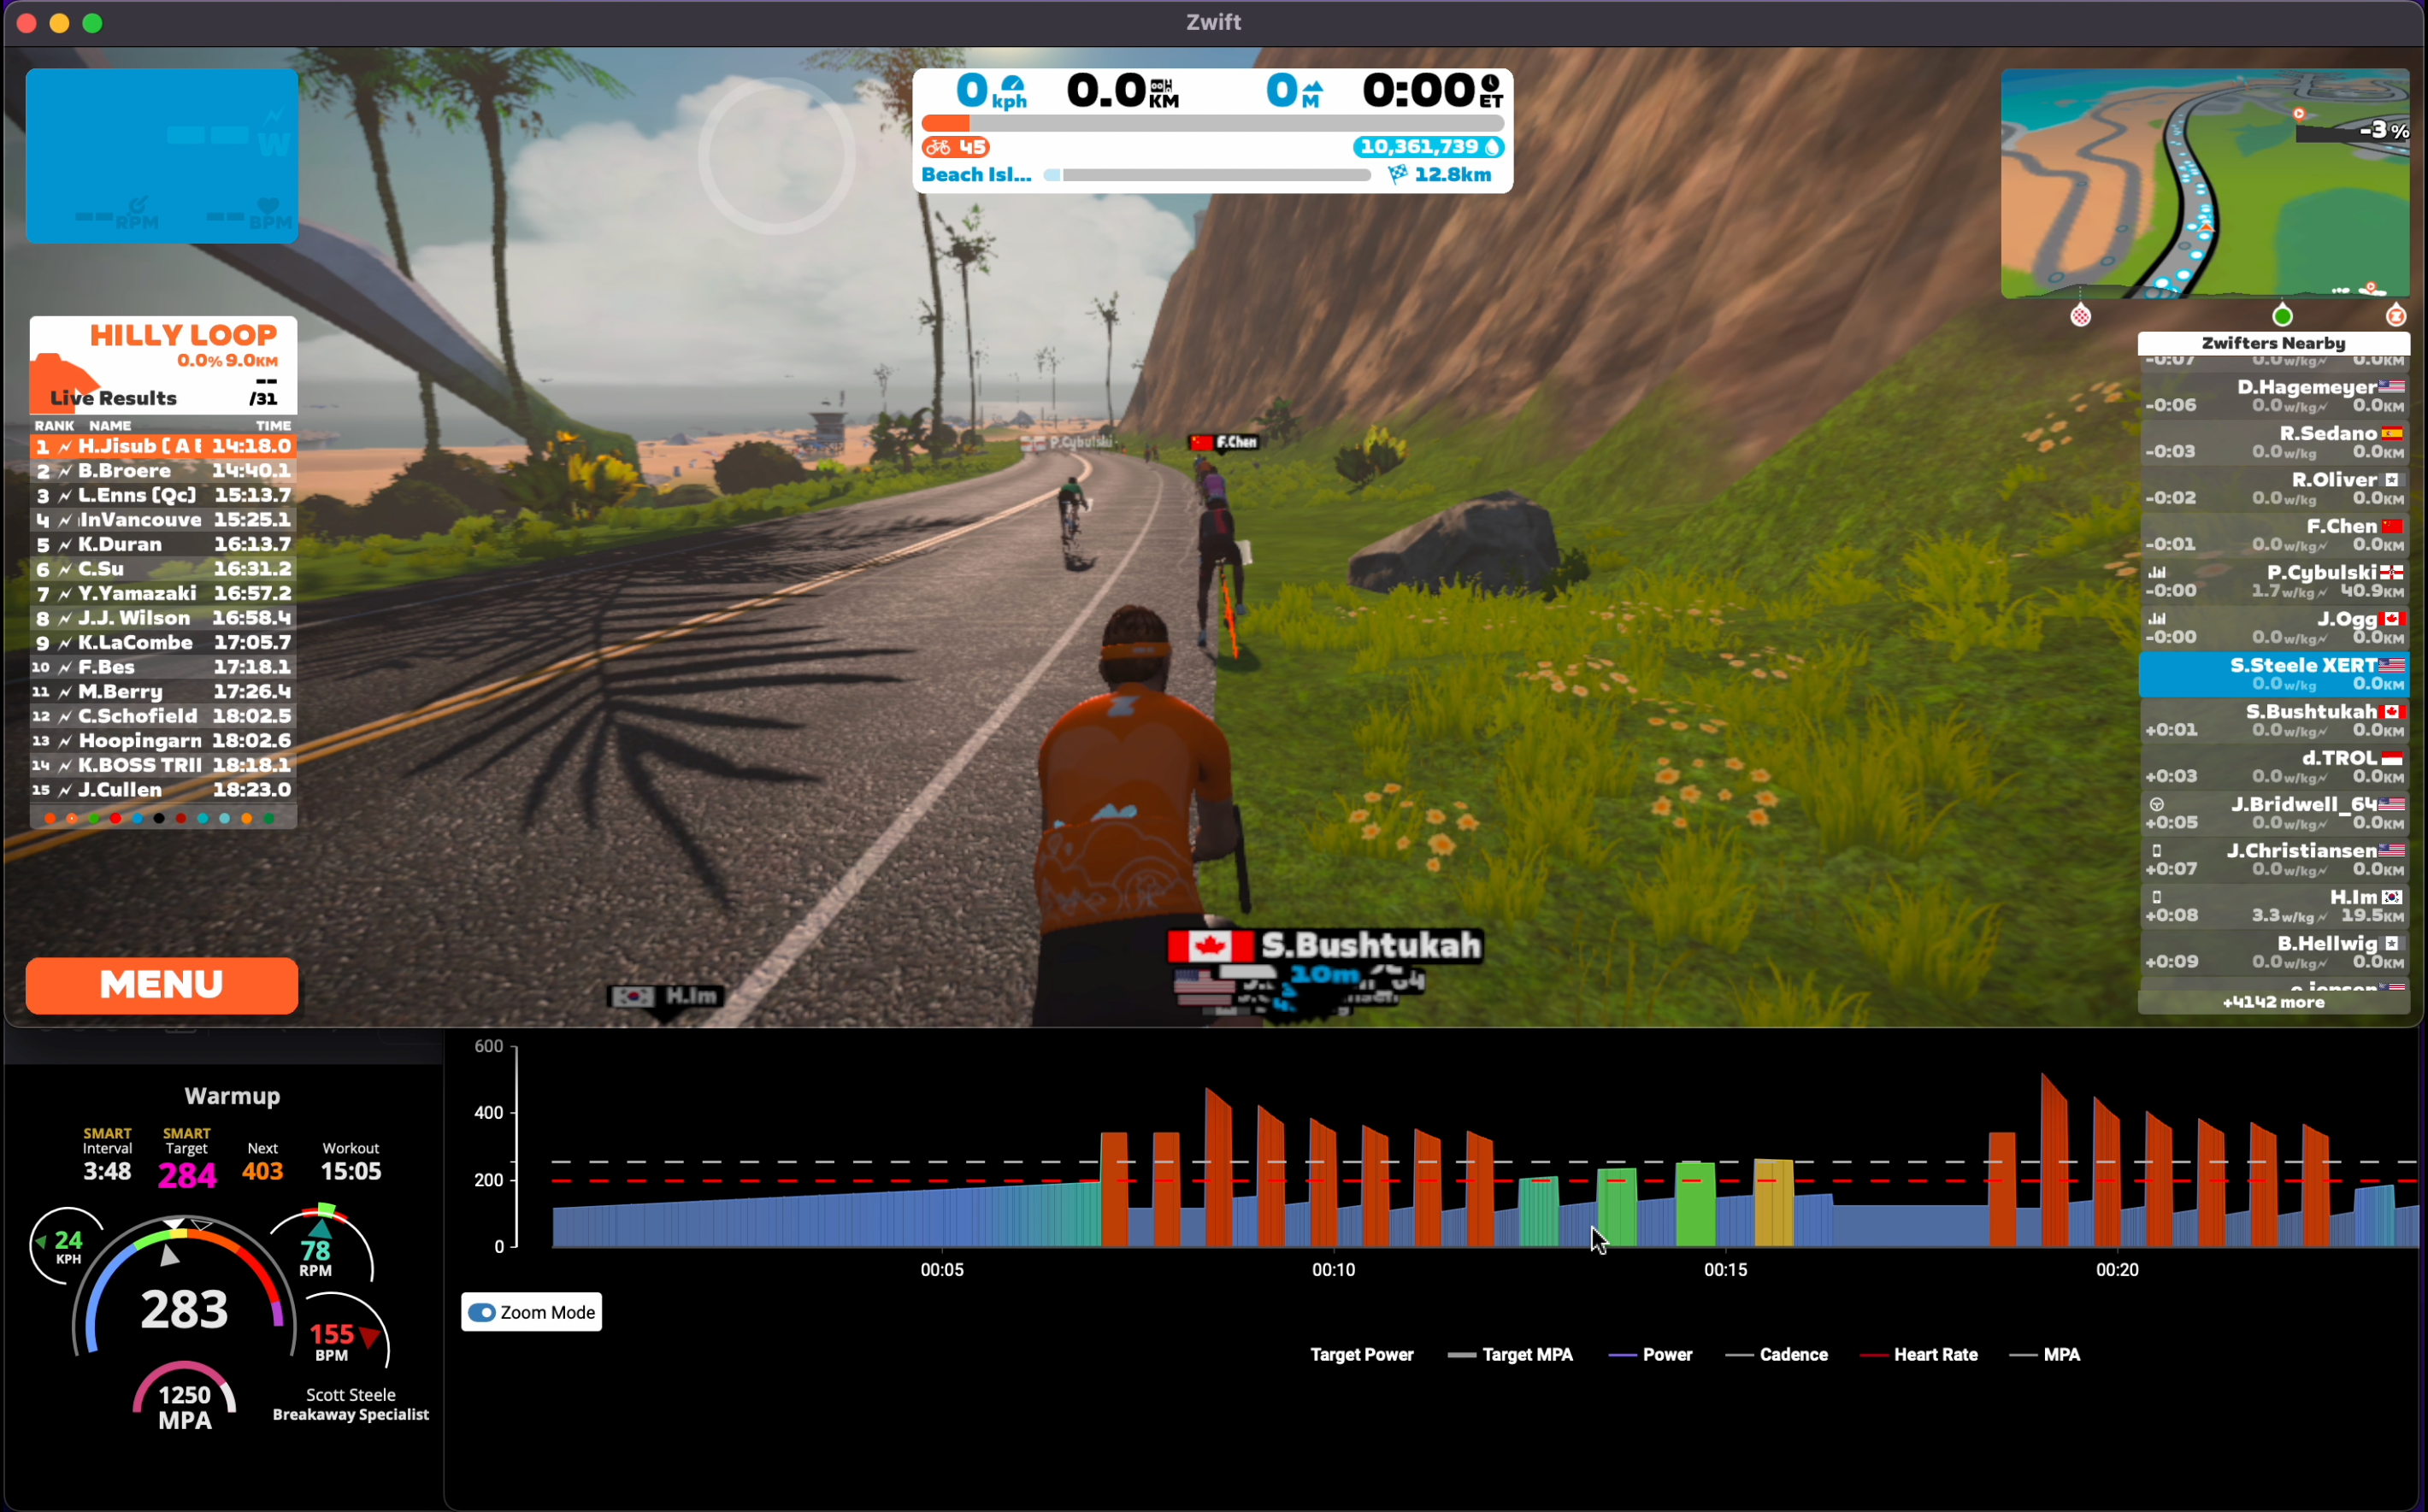
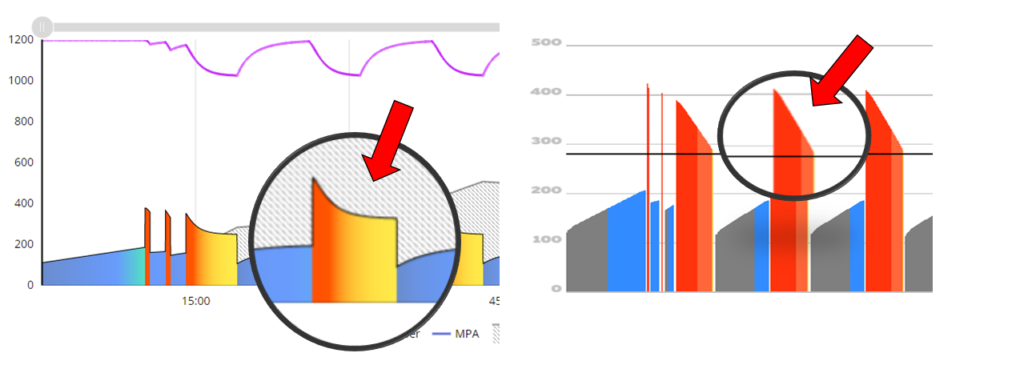
Note: Xert’s curvilinear XSSR intervals will be exported as ramps based on %FTP, so some workouts may be harder (or easier) than performing the workout with one of the Xert Workout Players. Example shown below using the SMART – Closer 170 workout:
2. Xert EBC Workout with Zwift
This option allows you to leverage the benefits of Xert’s SMART workout functionality, including variable power and variable duration workouts. With this option, Xert will control your smart trainer, while Zwift will only be paired to your Power Meter & HRM (if applicable). To use this option, you will need to perform the workout from one of Xert’s players: Xert Player for ConnectIQ, Xert EBC for Android, or Xert EBC for iOS. You can even overlay the data from Xert’s remote player around the Zwift app on your PC.
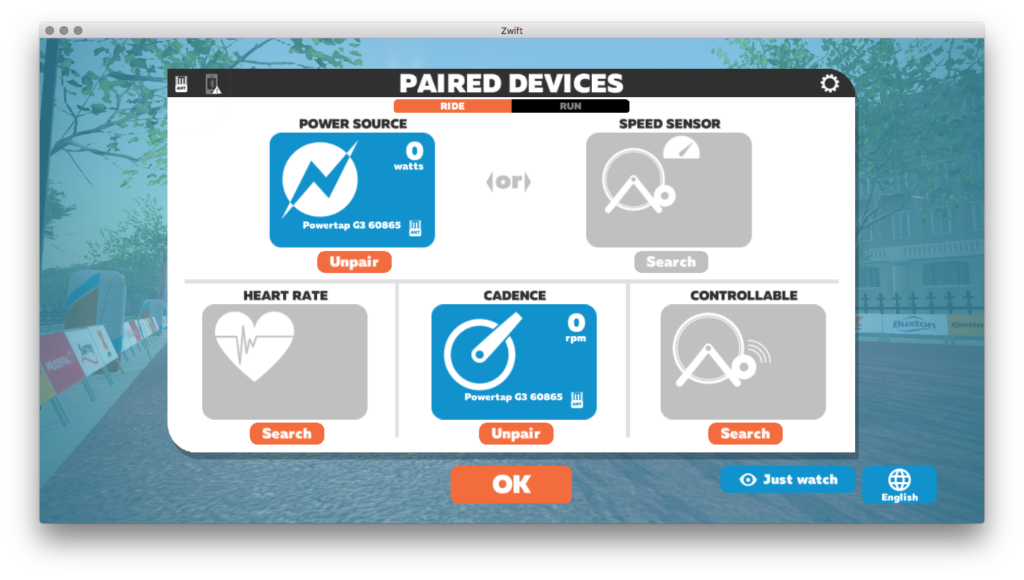
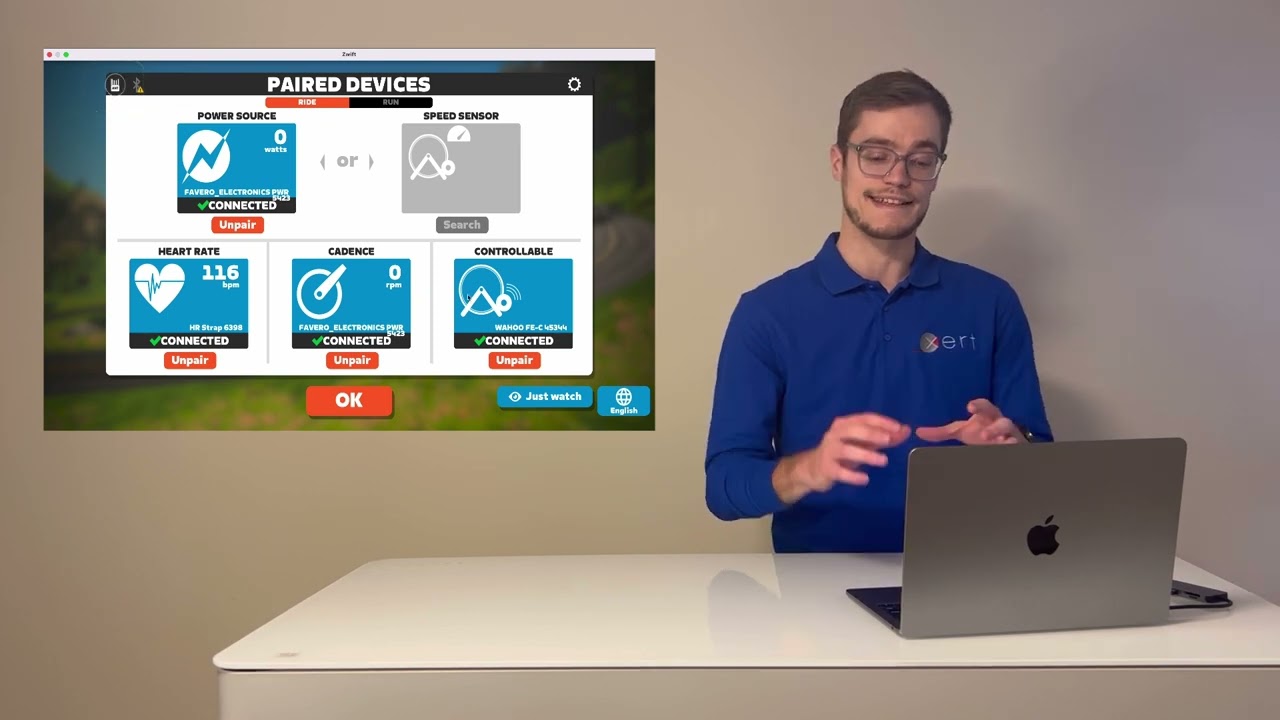
Step 1 – Zwift Setup: There are a few key changes you’ll need to make in order for this to work. Firstly, ensure that Controllable Trainer is disabled – notice that the CONTROLLABLE option is empty in the screenshot above. The only sensors that should be paired are Power Source/Cadence & HRM (if applicable). If possible, pair your sensors to Zwift using ANT+.
Next, you will want to make sure Zwift is in windowed mode – this is necessary if you wish to overlay the Xert Remote Player. On MacOSX, move the mouse cursor to the top-left of the screen and click the green circle to make sure you’re not in ‘full screen’. For Zwift on Windows, under Settings > Screen Mode select Windowed and not Full Screen.
Step 2 – Xert Workout Player Setup: Next, launch the Xert EBC app (Android or iOS). Ensure that your smart trainer is paired under Trainer Control. Xert EBC can be paired to any FTMS-compatible trainer via Bluetooth. If your sensors are paired to Zwift via ANT+, you can also choose to pair your Power Meter & HRM to Xert EBC under their dedicated sensor type. Power-match is supported by default, so be sure to pair your Power meter to the ‘Power Source’ and Smart trainer to the ‘Trainer Control’ sensor.

To learn more, check out the Quick Start Guide for Xert EBC Android, and learn about using the Xert EBC app for iOS.
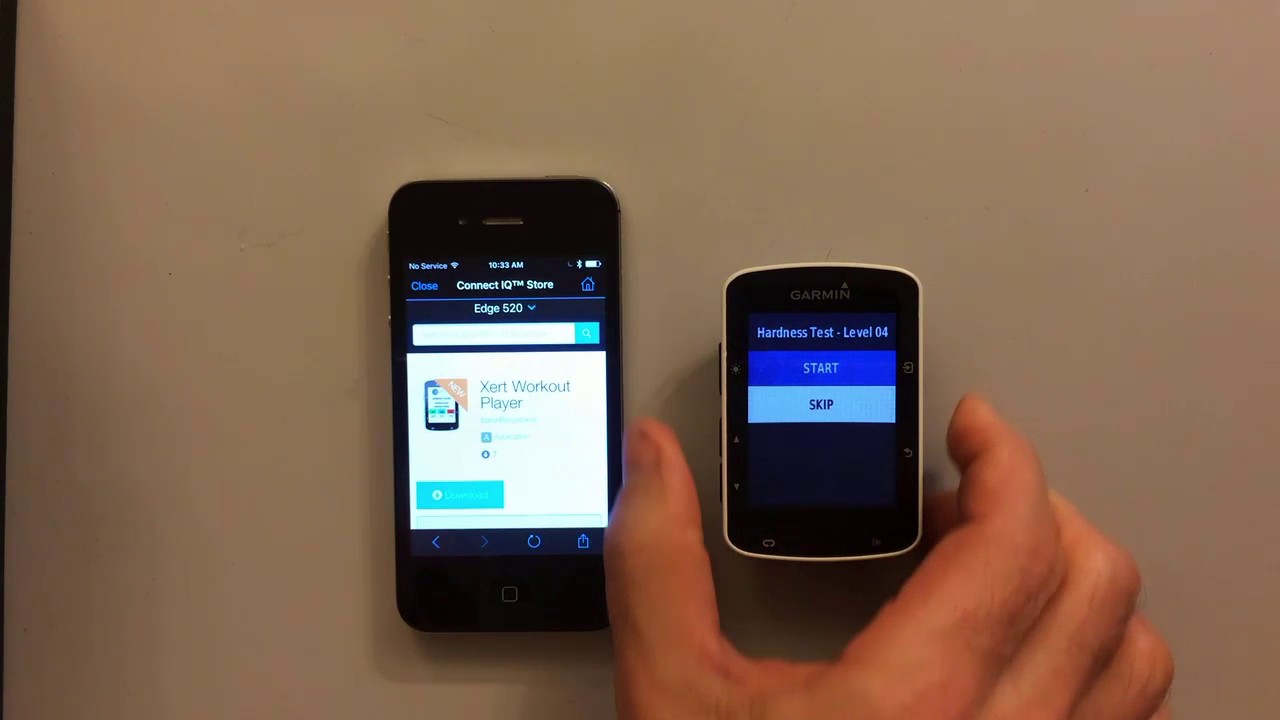
Alternatively, you can also use the Xert Workout Player for compatible Garmin Edge devices. Simply follow the setup guidelines as described in our video:
By default, the Xert ConnectIQ Player for Garmin supports power-match, enabling you to use the power coming from your power meter to control your smart trainer.
Step 3 – Overlay Xert Video Player with Zwift (Optional): Although the addition of the Video Player interface is optional, you may find the ability to view it nearby or on the same screen as the Zwift app, helpful during your workout. The remote player can be used to view upcoming intervals and summary statistics from your workout.
The Video Player default size is quite large. Use this default size setting when using a separate, dedicated device for the Remote Player and place the device within view. You can run the Remote Player on a tablet or laptop, and place it in front of you while you Zwift on another screen. If you would like to overlay the Remote Player on the same screen as Zwift, click the small arrow button to pop each section into its own window. You can now reposition and resize those windows together with your Zwift app!
Here is an example desktop on MacOS:

Step 4 – Select Workout: Last, select the workout that you would like to ride using the Xert EBC app and start pedalling. When paired correctly, Xert EBC will control the resistance of your trainer according to the workout while Zwift passively reads the power data to move you through the virtual course!
Because Xert is controlling the workout and Zwift is only recording the power data, you get the full benefits of Xert’s curvilinear intervals and SMART power intervals, which adapt second-by-second as you progress through the workout. These curvilinear intervals provide an interesting view in Zwift – see the example below:
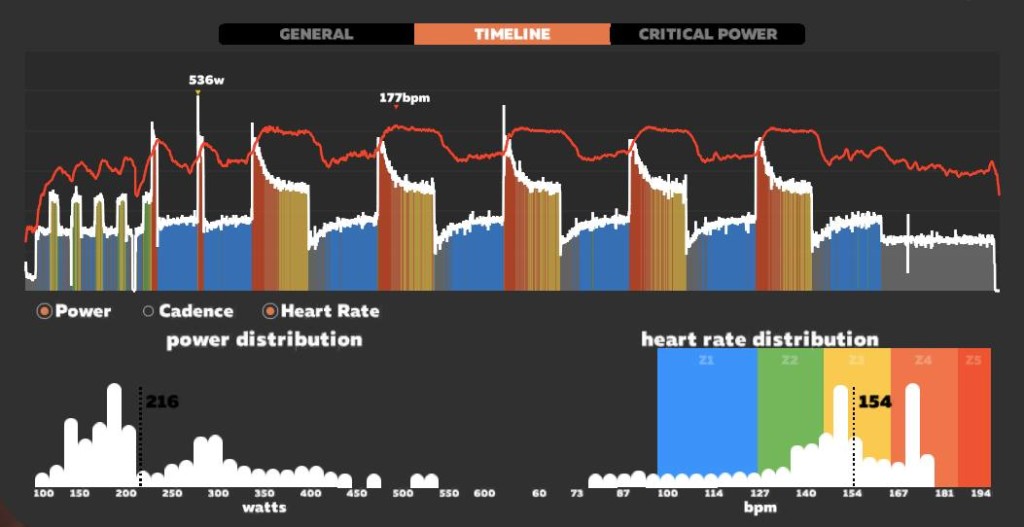
Greg Leo, of Team DRAFT, demonstrates his use of Xert during a hard ride using a custom configured MPA gauge on this ride screen – see top/middle of the screen.
That’s all – hopefully you find this blog post helpful and informative!