Quick Start Guide: Xert EBC for iOS
The Xert EBC app for iOS devices allows you to review & analyze your activities, pair your fitness sensors, select & record your indoor workouts as well as outdoor rides! This quick start guide serves to help users become familiar with the interface & various features available in the app.
Note: The Xert EBC app can even be downloaded onto newer Mac devices with Apple Silicon. This could be an option for users who want to train indoors with a Mac.
 Contents
Use the links below to jump to a specific section!
Login
The first time you download and open the app, you will need to enter your Xert username & password to login. The app will remember when reopening in the future, unless you log out.
 Activities
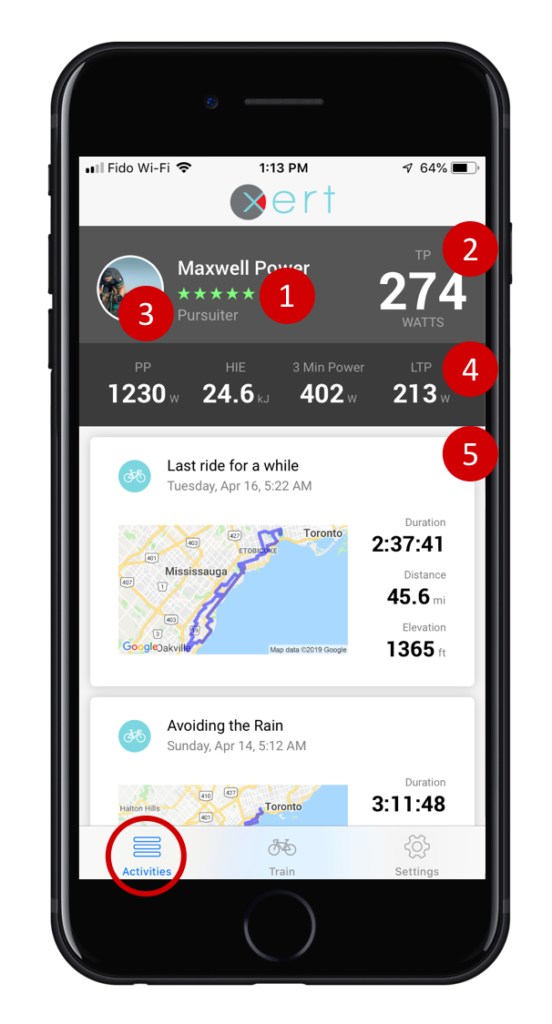
In the Activities summary view you’ll see your:
- Current Training Status – Number & Colour of stars
- Current Threshold Power – in Watts
- Athlete Type
- Complete Fitness Signature – including your Lower Threshold Power (LTP)
- Summaries of your Activities – Listed in chronological order
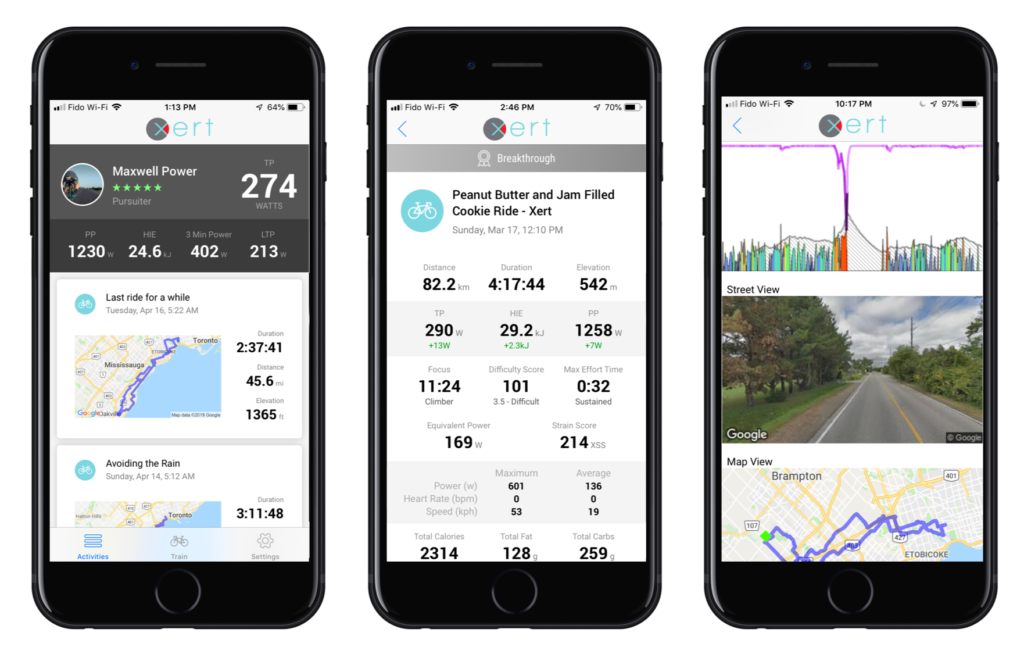
By tapping on an activity ‘card’, an expanded view of the metrics from that activity is displayed. If you had a breakthrough during the activity, a banner will appear at the top and you’ll be able to see how your breakthrough impacted your Fitness Signature. By scrolling down you’ll see an image of your MPA chart, a Google Street View from the location of your breakthrough, and the map of your activity.
Period Statistics
The Period Statistics tab will take you to summary stats for your last week, month, or year of rides. The number of rides in the selected time period is displayed in the top right-hand corner.
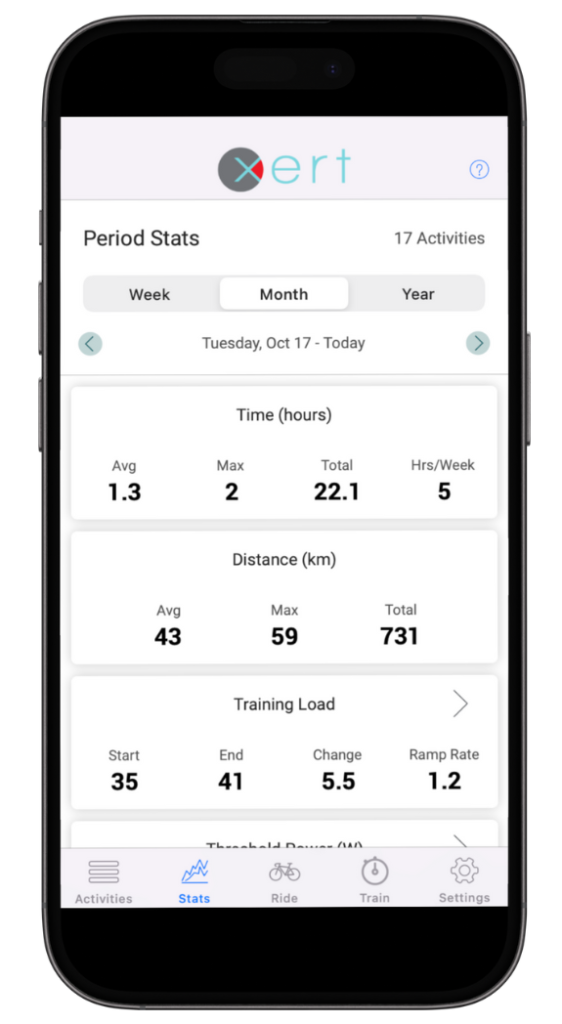
You can scroll through to find analyses for Time, Distance, Training Load, Fitness Signature, Xert Strain Score (XSS), Focus, & substrate utilization.
Ride Outdoors
The Xert EBC app can be used as a ‘back pocket’ ride recorder. Some users like using this as a back-up data file, in case their bike computer has a problem. Others even mount their iOS device on their handlebars & use the app as a replacement for a bike computer! Before pushing off, be sure you’ve paired your sensors in the Settings menu.
While in a ride, the Xert EBC app has 4 different pages, which show a variety of metrics:
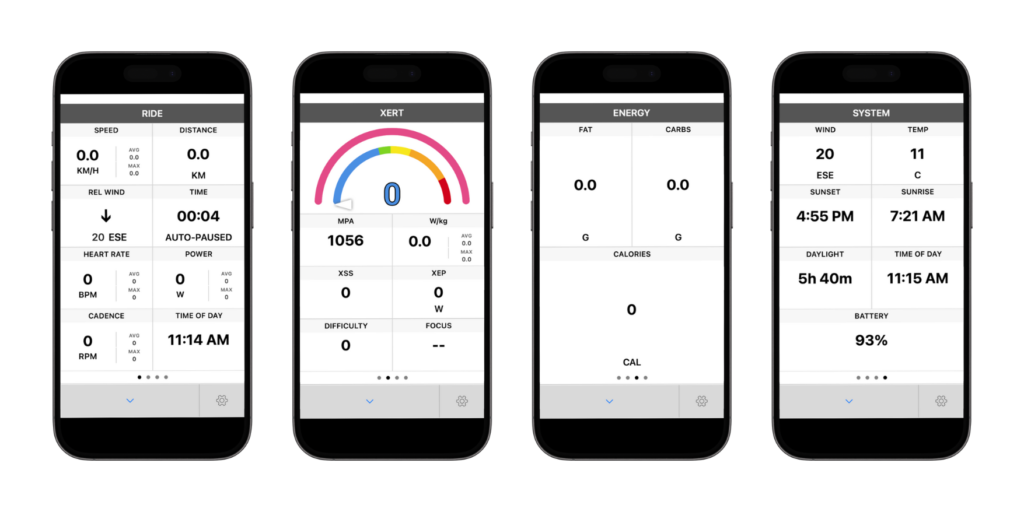
- Ride: Ride Time, Duration, Heart Rate, Cadence, Windspeed/Direction, etc
- Xert: MPA/Power Gauge, XSS, Focus, Difficulty, etc.
- Energy: Calories, Fat & Carb utilization
- System: Sunrise, Sunset, Daylight Remaining, Battery, etc.
Train
The Train tab is perhaps the most powerful section of the app! At the top, the EBC app will display the information from Xert Adaptive Training Advisor (XATA), including your Program Type, XSS Surplus/Deficit, Recommended Focus, XSS, & Difficulty.
Below the header, you will find Workouts. If you have already selected ‘Play Now‘ or have ‘Scheduled‘ a workout, the Xert EBC app will have your workout ready for you. If you haven’t pre-selected a workout, you will see all workouts in a list, ranked by how closely they match the advice of XATA – e.g. workouts near the top of the list are more highly recommended. If you’d like to do a different workout than the one recommended, you can either scroll down and select another by tapping it, or you can search/filter the workout list and select from there.
Searching & Filtering Workouts

If you’re looking for a particular workout, you can type in name & Xert will filter the workouts accordingly.
Upon tapping the filter icon, you can filter to include (or exclude) Standard, Personal, or Coach (if you’re a member of a coach community or squad) by tapping the respective button. Use the Workout Duration filter if you have a maximum (or minimum) amount of time to train. Lastly, you can filter the workouts by Focus Type.
Tap the ‘Filter‘ button when you have made your selections to update the workout list. You can also tap ‘Clear‘ to remove all filters.
Settings
The settings page allows you to configure your sensors, access information about Xert, or log out.
Pairing Fitness Sensors
The Xert EBC app allows you to configure your fitness sensors via Bluetooth. For users with ANT+ apps, consider the use of a CABLE device to Convert ANT+ signals to Bluetooth.
Note: Remember that most Bluetooth sensors only support one connection at a time. If you are having trouble finding one of your sensors, ensure the sensor is not already paired to another app or device.
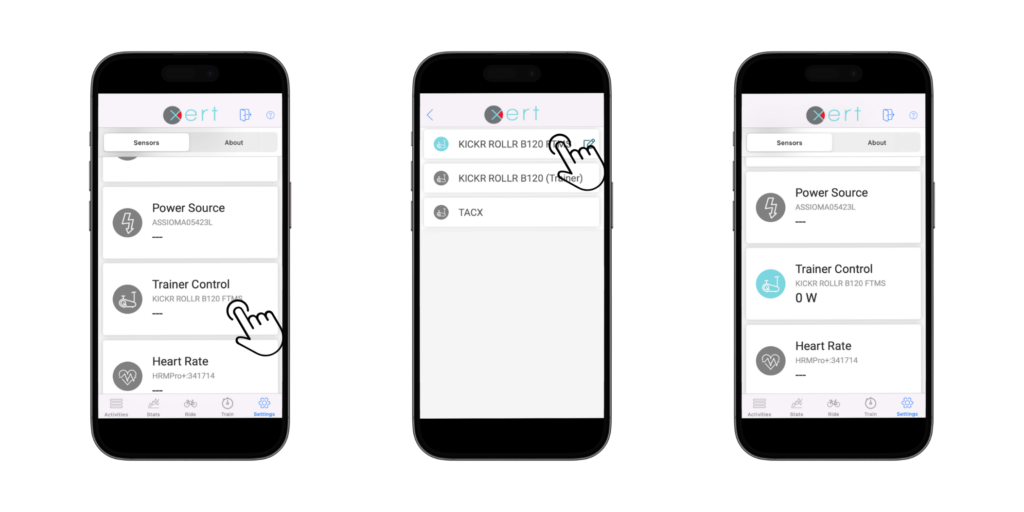
To pair a sensor, tap on the sensor type and find your sensor in the list, then select your sensor to pair it. The sensor type icon will switch from grey to turquoise once Xert EBC has successfully paired & is reading data from the sensor. The real-time value from the sensor is shown below the sensor name.
- Radar Source: Pair on-bike radar units (like Garmin Varia) for outdoor rides
- Power Source: Pair your Power Meter or Smart Trainer
- Trainer Control: Pair your Smart Trainer here, if using one. If available, select the FTMS option.
- Heart Rate: Pair your HRM here
- Cadence: Pair your Power Meter or Smart Trainer Cadence
- Speed: Defaults to Speed from Power (indoors) and Speed from GPS (outdoors). We recommend leaving the default settings.
- ANT+ Adapter: a CABLE unit can be used to pair ANT+ sensors to the EBC app
Note: Xert EBC automatically enables Powermatch when a a dedicated power meter is used with your smart trainer. Powermatch means that your on-bike power meter is used to adjust the resistance from your smart trainer, thereby ensuring that your power data is consistently measured when riding indoors AND outdoors.
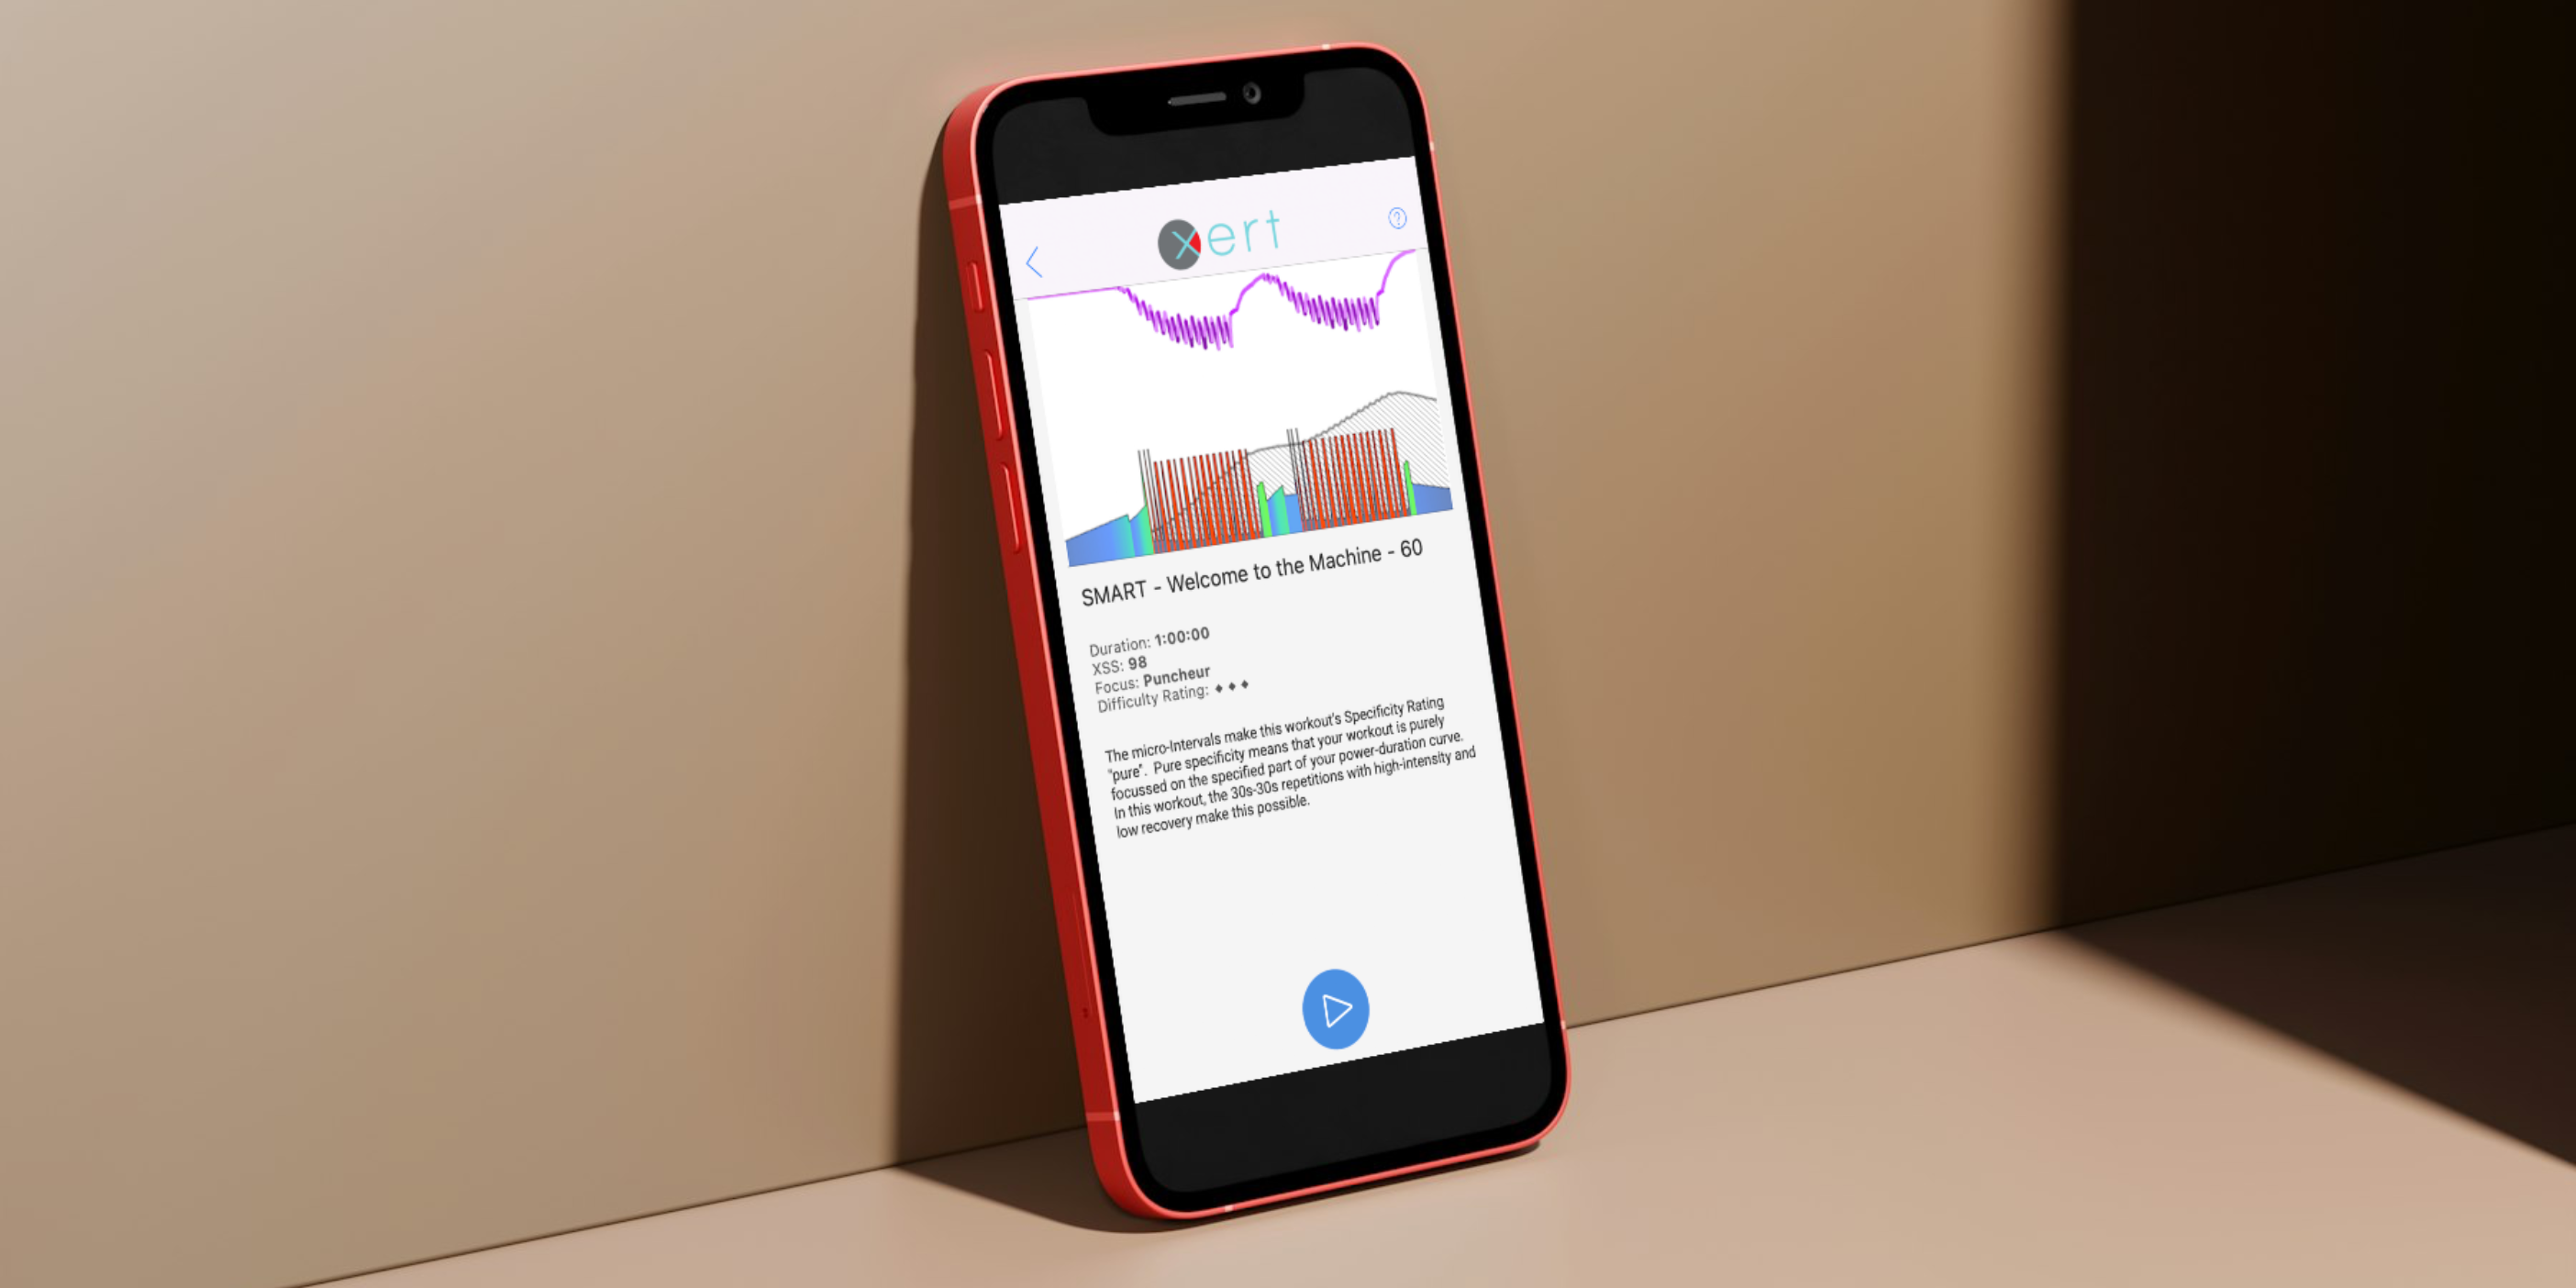
Using EBC for Indoor Workouts
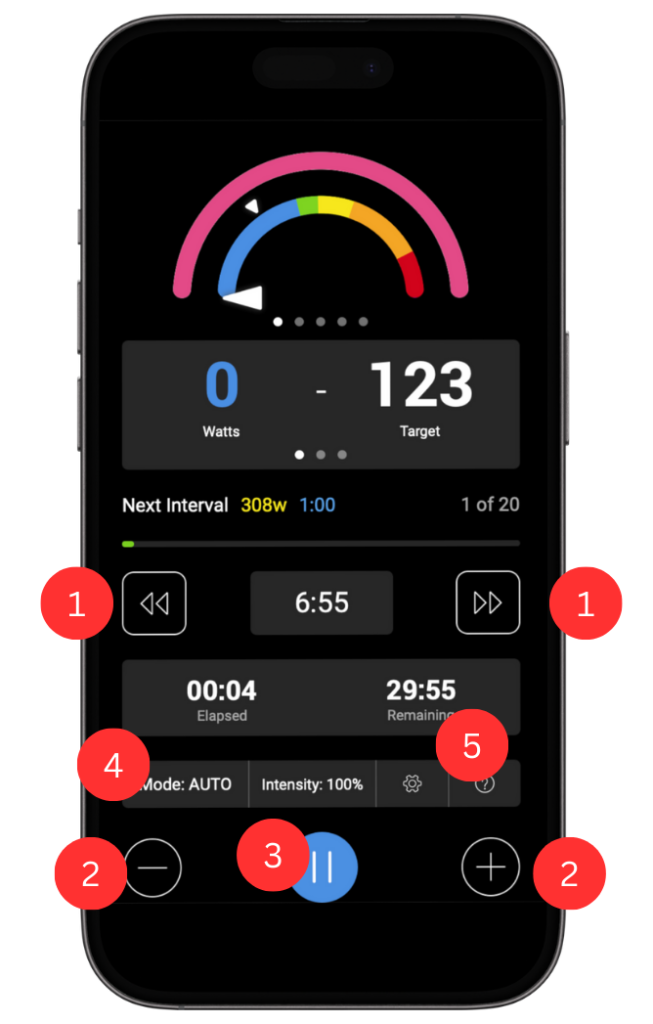 To do a workout, first ensure that your sensors are configured and awake, then tap any workout to select it, and then tap the play button. The controls and views available during your workout are:
- Skip/Repeat Interval: Skip to the next interval or return to the beginning of the current interval. If the current interval is < 10s, using the left facing arrows will return you back to the previous interval.
- Workout Intensity: Increase or Decrease the intensity of the entire workout.
- Pause/Stop Workout: Pause the workout in progress. From there, you can choose to Resume, Save, or Discard your workout.
- Note: When saved, activities will be uploaded automatically to Xert Online. If no internet connection is available when saved, it remains locally on your device. After restoring network connection, pull down on the activities screen to refresh & upload your activity.
- Trainer Modes: Toggle between various trainer modes.
- In virtually all cases, we recommend leaving on the default AUTO setting.
- Settings: Configure your sensors on-the-fly. Once configured, press the back button in the top left corner of the Sensors page to return to your workout.
Workout Displays
The Xert EBC can provide loads of information during your workout. You can access this information by swiping the two top sections to the left or right.
Top View Options
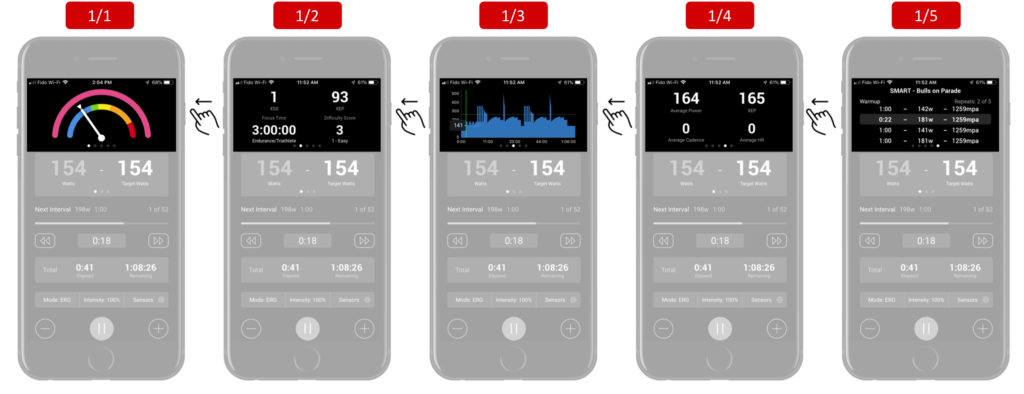
- MPA & Power Gauge (1s power)
- Real-time XSS, XEP, Focus, & Difficulty
- Workout Profile with current & target power
- Avg Power, XEP, Avg Cadence, Avg Heart Rate
- List of Intervals
- Name of the current interval ‘set’ (top right);
- Name of the current interval (top left);
- Number of interval ‘repeats’ – and progress so far in this set
- Duration, average power, and finishing MPA of the completed interval(s) – above highlighted row
- Duration, target power, and target finishing MPA of current interval – highlighted row
- Duration, target power, and target finishing MPA of next interval(s) – below highlighted row
Middle View Options
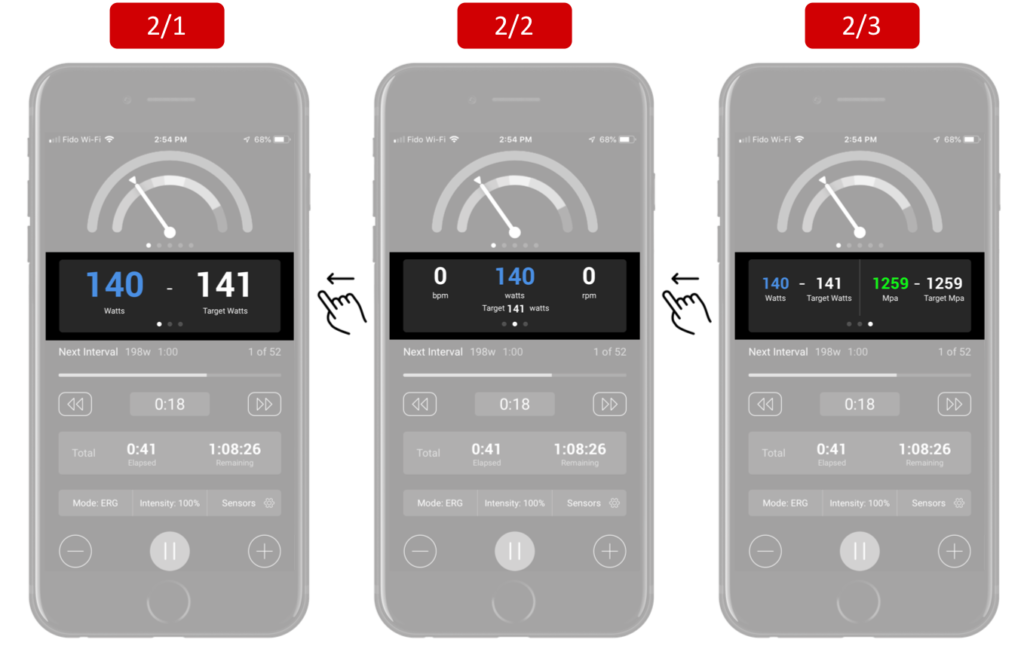
- Current/Target Power
- Heart Rate, Current/Target Power, & Cadence
- Current/Target Power & Current/Target MPA (by end of current interval)