There is a growing list of top tier coaches that are using Xert to train their athletes using Xert’s leading and advanced approaches. Follow the steps below to setup & manage your coaching community in Xert. For some insight into coaching features that differentiate Xert from other platform, click here.
Creating a Coach Community
As a coach you will need to register for a user account first. You do not need to have a Premium (paid) subscription to Xert to coach others, but we recommend it as it’s a great way to learn the system and to see what you’re athletes are seeing. Here’s how create a coach community:
- Use the menu and click Communities/My Coach and click the Create your own community button:

- Choose the Coach radio option

- Input your Coach Community details and Save. Your Coach Community is now created and available.

- Use the Share Icon or Share Link to copy the URL that you can share to invite athletes to your Coach Community. Paste the link in an email or message that you send to your athletes. The URL will look like this: https://www.xertonline.com/coaches/<coach-community-name>/join

Settings
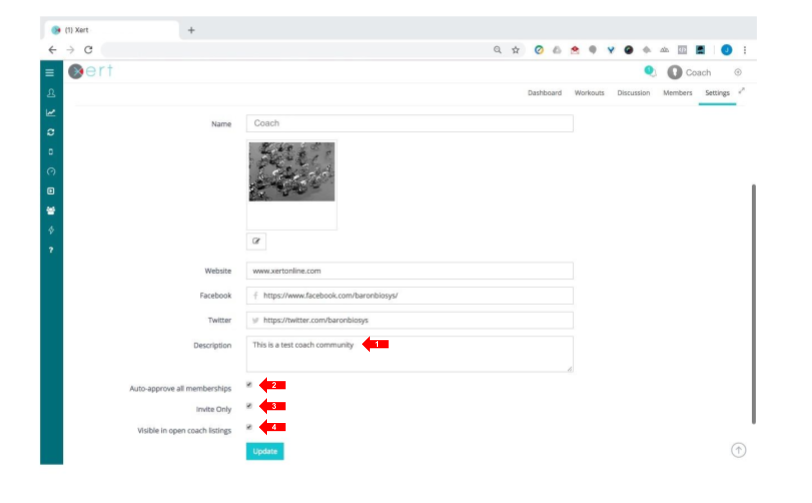
Your settings can be updated at any time. Besides changing your logo or picture, company URL, and company social media sites, you’re also able to:
- Add a description of your coaching business: this is a great place to talk about your coaching philosophy and approach, coaching interests, as well as any designations & certifications you have acheived.
- Auto-approve all memberships: through the Community > My Coach menu on the left side of the website, athletes can search for coaches and request to join their community. Clicking this box allows athletes to see you in the list of coaches, click ‘Join’, and be automatically added to your coaching community. They will be able to see your workouts & discussions, and as the coach you’ll be able to see their profile, activities, Fitness Signature, and other details.
- Enable joining by ‘Invite Only’: by clicking this box your coaching business will appear on the list of coaches, but athletes will not be able to join your coaching community. To add them to your coaching community you must invite them to join.
- Hide your coaching business in the coach listing: if ‘Visible in open coach listings’ remains disabled, your business will not be visible in the list of coaches.
Your Coaching Community
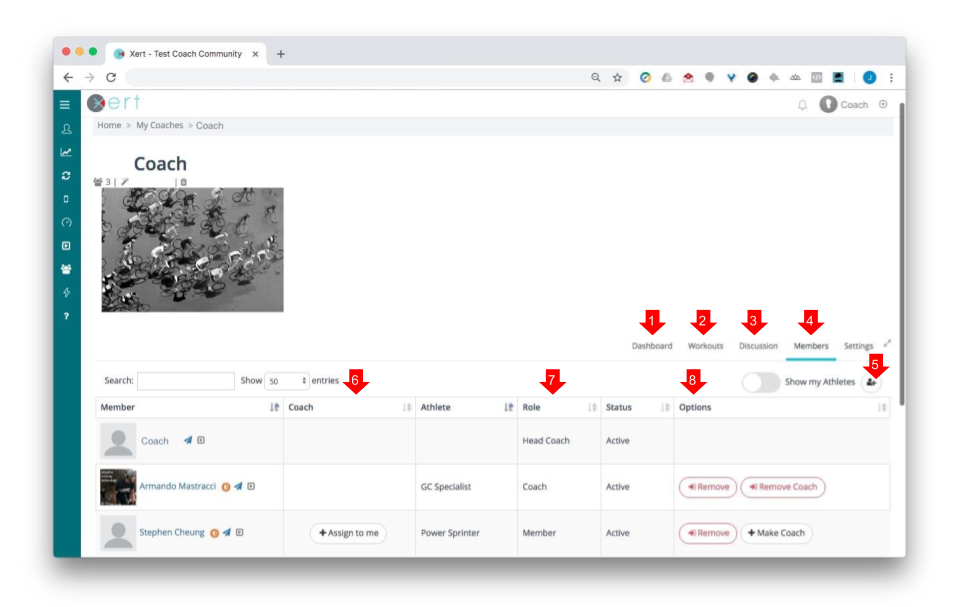
Within your coaching community are several important tabs and columns.
- Tab – Dashboard: allows you to see, and open, all activities completed by your athletes. They are listed in chronological order with the most recent one at the top.
- Tab – Workouts: any workout you create in your athlete or coach profile will appear here. Your athletes can search, review, and do these workouts, and you’re able to add these workouts to your athlete’s planner.
- Tab – Discussion: this is an integrated Rocket.Chat forum which is open to you and your athletes. You can answer questions, discuss training & physiology, and provide tips using this feature.
- From the discussion tab, you can also send personal messages to athletes within your coaching community
- Tab – Members: all coaches & athletes who have joined or requested to join your coaching community appear in this list. Enabling “Show my Athletes” limits the list to joined & accepted athletes within your coaching community. Coaches within your community, and athletes who have requested to join but who have not been accepted, will be omitted from this list.
- Tab – Invite athletes: by clicking this icon you can invite athletes by username or email.
- Column – Coach: you can elect to assign any unassigned athlete to your specific coaching business. Once assigned, you can see which coach (if you have other coaches within your business) this athlete has been assigned to.
- Column – Role: there are three different roles visible in this column…
- Head Coach: a profile can have many coaches and athletes. The Head Coach is the admin profile for the coaching business used in this example.
- Coach: this is a coach within the head coach’s business
- Member: this is an athlete member of the coaching community
- Column – Options: for each member you are able to add and remove coaches, and approve athletes who have requested to join your coaching community.
Broad Functionality
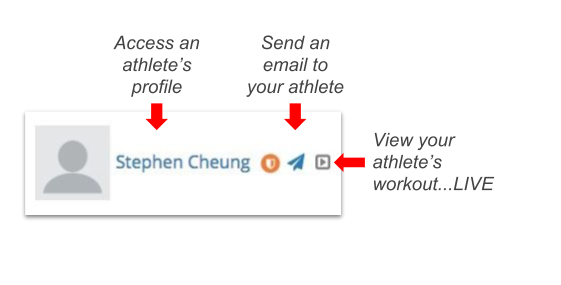
Powerful functions are available directly from the Member column including the ability to view their workout LIVE through their Remote Player, send them an email directly to the email address associated with the athlete’s Xert account, and access the athlete’s Xert profile to unlock a broad set of functionality.For example, as a coach you can:
- view all of your athletes’ activities and activity history exactly how they see them, to look for patterns and insight;
- access detailed activity data to help trouble-shoot wonky power data or answer questions about their Fitness Signature;
- add comments into planned and past activities for the athlete to review;
- create your own library of workouts and drop them into a specific day within your athlete’s Fitness Planner;
- you can even pay for their subscription to Xert through the billing portal.
And that’s what you need to know to get started with your coaching business using some of the most advanced tools available for athletes, and coaches.